Thursday, September 28, 2017

Summer Fun (Prima Marketing)

Dear crafty friends,

I'm here today to share a layout I created using Frank Garcia's beautiful St. Tropez line. Here it is.


I just love the beachy feel of the St. Tropez papers! It inspired me to create this layout, featuring this picture where my kids were near the St-Laurent's river, here, in Quebec City.


To create my background, I used stamps and my Sea Breeze Color Philosophy Ink. This ink is the perfect match for this collection!


I went a bit crazy with the texture, playing with a fishing net, some cheese cloth and lots of Art Stones (regular and mega!).


On the picture above, you can see that I used a stencil (the Prima 6x6 Circular Lattice Stencil) and some modeling paste to create more texture on my background. I went with the bubbles/circles theme.


Here and there on my layout, you can see some raw 2Crafty Chipboard pieces. I thought it added so much to the layout.


Lots of flowers, of course!

Here and there in my flower clusters, you can see some old lace.


A few light brown flowers, to tie everything together.


I used some journaling cards from the collection to mat my picture. The chipboard frame is from 2Crafty Chipboard.


A texture shot.


I hope you like it!

Prima products used:

Have a nice day.
Karine
xx


Sunday, September 24, 2017

Love You to the Moon and Back (2Crafty Chipboard)

Dear crafty friends,

Here is my second layout for 2Crafty this month. It is much more ornate than the first one. It is called Love You to the Moon and Back. Here it is.


My starting point was the gorgeous moon piece from the Love You to the Moon set.


I covered it with gesso. Then, I used a stencil and modeling paste to give it some dimension. I wanted it to look like the real moon, with its craters. I then covered it with Prima waxes. It's so easy to use to color chipboards!


I used the same waxes to color my two Dreamcatchers. I places them towards the bottom of my layout. Flowers are from Prima Marketing.


Here and there, I scattered some stars from the Love You to the Moon set. I embossed them with a glittery black embossing powder.


My title piece is also from the Love You to the Moon set. 


I used some waxes to color it as well.


There is a lot of texture on that layout!

2Crafty Chipboard supplies:

Love You to the Moon Set


Dreamcatchers


I would like to enter the challenge over at Accent Scrapbooking


The moodboard is just soooooooo gorgeous!

I really hope you like my layouts.
Have a great day.

Karine 
xx

Saturday, September 23, 2017

Dream a Little Dream (2Crafty Chipboard)

Dear crafty friends,

I'm here today to share my first layout for 2Crafty Chipboard this month. 

It is called Dream a Little Dream. Here it is.


My starting point was this beautiful Frame Madeline's Flourish. I embossed it with green embossing powder. I felt it was organic, so I chose earth tones for the rest of my layout. The paper is from Prima's St-Tropez line.


My title piece is the beautiful Dream a Little Dream chipboard piece. I love the font of the word Dream. I embossed it with the same embossing powder, as I thought my layout missed a touch of green.


I used a lot of the Foliage Set 1 throughout my flower clusters. Flowers, of course, are from Prima Marketing. 


I embossed the foliage with a pale gold powder.


2Crafty Chipboard supplies:

Frame Madeline's Flourish

Dream a Little Dream 

Foliage Set 1

Thanks for stopping by today.
Have a great day.

Karine
xx

Sunday, September 17, 2017

You Make Me Happy (Words & Paintery)

Dear crafty friends,

I'm here very quickly this morning to present you my layout for this month Words and Paintery challenge.


I wasn't sure about the color combo this month, but as usual, I'm loving the result. 


Here are some close-up pictures:


I used the Domestic Goddess collection from 7 Dots Studio as my base for this layout.


The Word Stickers are from the Verano Azul collection, also by 7 Dots Studio.


Flowers are from Prima Marketing, and chipboards are from 2Crafty Chipboard. I embossed them in black.


Flair badges are from Accent Scrapbooking.

I really hope you come and play along with us this month.

Have a great day.

Karine


Saturday, September 16, 2017

Julie Nutting Tags (Prima Marketing)

Hi there, crafty friends,

I'm a little behind on sharing my creations with you on my blog. 

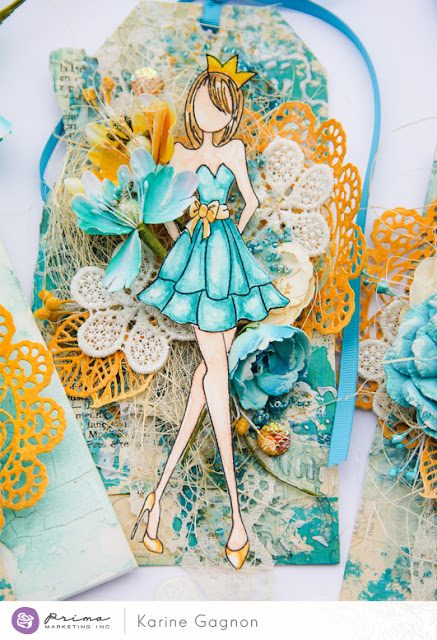
This week was Julie Nutting week on Prima's blog. I got to create three tags with the two JN stamps I own. I don't often create tags and I thought this was so fun.

Here is what I came up with.


I started with tags from an old JN tag pad and created a mixed media background. I chose to glue one of my tags on a small 6x6 canevas on which I used white crackle paste.


I colored my background with Color Bloom Deep Teal and with Art Alchemy Acrylic Paint in Emerald Green. 


I used some dies to die-cut leaves and doilies from a paper that I covered with the oil pastels. 


I then adhered lace, flowers, SIIC, beads, and micro-beads to decorate.


I stamped the dolls on watercolor paper and I used Watercolor Confections in Tropical to color them. 


I think everything came up pretty well. I had fun creating those tags.


Prima products used: 583002 - Magnolia Trims, 961503 - Art Extravagance - Texture paste - White Crackle, 961442 - Art Basics - Heavy Gesso - White, 961466 - Art Basics - Gesso - Clear, 961411 - Art Basics - Modeling Paste, 961398 - Art Basics - 3D Matte Gel, 961428 - Art Basics - Soft Matte Gel, 962678 - Art Ingredients - Glass Beads - Turquoise, 962630 - Art Ingredients - Micro Beads - Splash, 962609 - Art Ingredients - Micro Beads - Pollen, 584092 - Forest Leaves Dies, 584047 - Pasrisian Lace Die, 590062 - Bundle flowers - Yellow, 590000 - Bundle flowers - Teal, 580322 - Color Bloom - Vintage Metal - Deep Teal, 963170 - Art Alchemy - Acrylic Paint - Metallique Emerald Green, 960575 - Lace Doily #3 6x6 Stencil, 590802 - Oil Pastels (20 - Ochre and 02 - Yellow), 582616 - Prima Flowers - Aquamarine, 910167 - Julie Nutting - Cassandra, 910426 - Julie Nutting - Natalie, 910235 - Julie Nutting - Tag Pad, 584269 - Watercolors Confections - Tropical

I hope you like my tags.

Have a nice day.
Karine

Monday, September 11, 2017

Forgotten Treasures + video tutoriel (7 Dots Studio)

Dear crafty friends,

I'm up, today, on 7 Dots Studio's blog to share a process video. Here is the layout I created.


I was inspired by the gorgeous moodboard of Mixed Media and Art. Isn't it gorgeous? I love those greens.


When I looked at the moodboard, I immediately thought of the Lost and Found collection! It was one of my all time favorite! So I grabbed the few papers that I have left and I created this piece, inspired by the colors, of course, but also by the threes and by the nature.


My background paper is called Stained (Lost and Found collection). I covered it with clear gesso and created a mixed media background over it. To create my background, I used two stencils: Dreamscapes - Geometry Stencil and Hazy Days - Chevron Stencil.


I created two main clusters on my layout. Both of them sits on the Typewriter paper (Lost and Found collection). I also used the Sticky Notes paper (Lost and Found collection).


I also used the Lost and Found - Tags 12x12 in my clusters.


I added texture here and there with stamps: Thoughts Keeper - Clear Stamps, Hazy Days - Clear Stamps and Dreamscapes - Clear Stamps.


I used the Lost and Found - Die-cut Element 6x12 and the Lost and Found - Word Stickers 6x12 here and there in my clusters. 


I really hope you like the results.


I created a process video for you to see. I hope you enjoy it.


7 Dots Studio supplies used: 
Lost and Found - Tags 12x12
Thoughts Keeper - Clear Stamps
Dreamscapes - Clear Stamps
Lost and Found - Die-cut Element 6x12
Lost and Found - Word Stickers 6x12

Have a great day.
Karine
xx